

Hosting a Virtual Wax Museum for Distance Learning
One of my favorite projects of the entire school year is our Wax Museum! If you aren’t familiar with a Wax Museum project, it is a day where students dress as an influential person and give a speech as if they actually are that person! It is so much fun to see students get so involved in this project, to the point that they adapt an accent and other mannerisms to really become their person. It is SO CUTE and definitely one of the highlights of the school year!!
In this post I will tell you how to host the best Wax Museum both in the classroom AND virtually!
Make the Research Fun!
Low prep, high engagement! Once students choose their influential person, it’s time to start learning about them! A lot of work comes before the day of the Wax Museum. After all, our students can’t transform into someone without doing a deep dive into the research first! I teach third graders, so their level of research expertise is limited. I provide them with a highly scaffolded research guide to help them make sense of the information they find either online or in books. You can read more about that here, and keep in mind that it is perfect for use as an in-class project or for distance learning.

Using the Influential Person Research Project in class allows students to create a scrapbook to tell about their influential person. They can print out pictures, color, and decorate the pages however they see fit. I like to think of it as creating a diary or scrapbook! Using this project with distance learning is fun for students, too. They will complete a PowerPoint or Google Slide presentation that has predefined text boxes and clear directions with checklists on each page. This makes it low prep for the teacher, and truly a student-led project!
Use an engaging book for research! A great tool for this project is the Who Was/Is biographical series! They’re written in time-order and kind-friendly language, which makes these books high interest for our students. The books can be found on Amazon, and they’re usually marked down from the list price! You can see a list of my favorite Who Was/Is books here! Another resource for research is Epic Books for Kids and a safe search engine is Kiddle.co!

Make it an Event to Remember
When we’re back in our classrooms for this project, invite other classes to visit! Students work hard on this project each year. I see them get really into character on the day of the Wax Museum and their performances are impressive! In years past, I’ve invited other classes in our school to come tour our Wax Museum. I make a simple Google Sheet and email it out to teachers. The teachers sign up for 15-minute blocks of time for them to come to our Wax Museum. Be sure to plug in a few minutes for students to take a break and don’t forget lunch!
What happens when other classes arrive at our door? My students freeze like wax statues. I pop my head out and give a quick set of directions to the visiting class:
1. Roam the room to listen to as many speeches as you can
2. In order to hear a speech from one of our statues, you will have to press the button* to turn them on (*Students made “buttons” on index cards that allowed guests to start their show! It was a fun way to bring them to life!)
3. Listen for your teacher’s directions when it is time to line up and go!
Encourage students to go all out! My kiddos performed their speech roughly 20 times that day. But they loved EVERY second of it! It was a bonding experience for our class, and it gave some of my quieter students a boost of confidence and excitement to be “someone else” as they recited their speech! Oh, and the outfits!! Encourage kids to step out of their comfort zone and into their character, what would they wear? What items would they have with them? How would they carry themselves? It’s really amazing to see what your kids can do if they know it’s okay to be silly and play pretend!
Play a slideshow in the background! Using my projector, I had a slideshow running on a loop that showed a real photo of each influential person so our visitors could compare the student version with the real version. My kiddos got a kick out of this and couldn’t help but shout “That’s me!” the first few times their person popped up on the screen. The slideshow was really easy to make. I just searched for photos of each influential person my students chose and inserted them onto their own slide. I typed the name of the person at the top of each slide, and set the slideshow to play on a loop. That means when it reaches the end of the slideshow, it just starts over again! Check out this freebie: You can download the slideshow I used for Google Slides here. Just swap out the photos or add more as needed!

Wax Museum… but Make it VIRTUAL!
This year our situation is a bit… different. The entire nation is involved in distance learning and we’re not allowed back in our classrooms for the foreseeable future. BUT, that’s okay! Host your Wax Museum virtually through video conferencing and recorded speeches! Here’s what I’m doing:
Students completed the Influential Person Research Project digitally. I used the PowerPoint version, but the resource works with Google Slides and SeeSaw as well. Our district doesn’t use Google Classroom, so I posted the PowerPoint version to Canvas, which is the platform we use to push assignments out to students. From there, they downloaded the PowerPoint, filled in their information, and submitted it. It’s really easy to use, even for students who aren’t very skilled in PowerPoint. You could use SeeSaw or Google Slides, just depends on what you’re comfortable with!

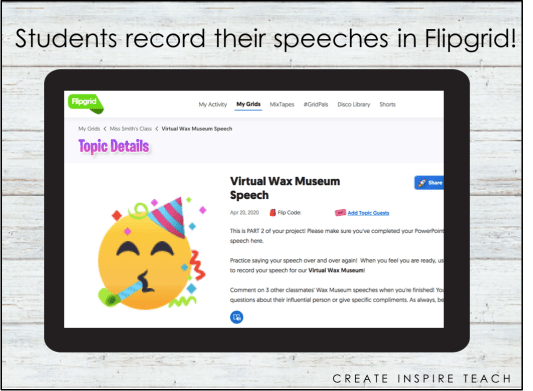
Use Flipgrid for virtual presentations! Once they finished their projects, they went to Flipgrid to record their speech! Part of the PowerPoint project guides them through the planning and writing of their speech, so once it’s done, they just practice reciting it until they’re comfortable with recording their video. Flipgrid is an online platform for educators that allows students to record short videos and post it to their teacher’s grid. You will have to make an account first, but it is a free tool that helps build classroom community while we’re socially distanced from each other! You can create your own “grid” to share with your students that allows them to record their speeches and view their classmates’ speeches, too!
Use a video conference tool for virtual presentation in LIVE time! I gave my students Monday-Friday to work on their research and PowerPoint. I did send an email to parents the week before assigning the project to let them know the expectations and to encourage them to chat with their child about who they’d like to choose as their influential person. This turned out to be a helpful idea, because on Monday almost all of my students had selected their person and were ready to start their project! We Zoom every Monday and Friday morning, so on Monday I went through the directions and explained both parts of the project (PowerPoint and Flipgrid video). I told them that for our Zoom meeting on Friday morning, I’d like them to dress as their influential person and present their speech live for us! Of course, I made it clear that dressing up either for their Flipgrid video or Zoom call was optional. I know these are difficult times and each child’s home situation is different, so I wanted to alleviate any pressure. But, most of my students were extremely into the idea of dressing up and pretending to be their influential person!
We talked about changing the background on Zoom to match what might be a fitting background for their influential person. Barack Obama might be at the White House, Serena Williams might be on a tennis court, and Misty Copeland could be in a dance studio or on stage! This got them even more excited. Some of us don’t have the capability to change our backgrounds, and that’s okay! I encouraged them to find props that fit their person’s life from around the house or draw them and hang them up so they’re on camera. I tried to provide as many ideas and options as I could to fit the needs of every student. After Monday’s Zoom call, they were really excited for Friday!
The Main [Virtual] Event!
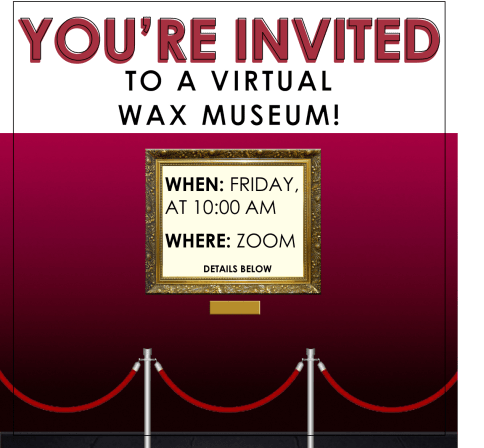
Welcome screen, muted mics, and pinned presenters! Students arrived at our Zoom call and saw a Welcome screen similar to the one above while I added their classmates in from the waiting room and gave a few minutes for everyone to join. Once all students (or as many as I expected to join) were on the call, we started presentations! Since presenting on Zoom wasn’t mandatory, students were able to tell me in the chat box if they wanted time to present their speech. Then, I took a backseat and let the kiddos be the stars of the show! As each student presented, I spotlighted their video so they were featured in the center of our screens. While a student was giving their speech, the rest of us stayed on mute. We un-muted to cheer for them when their speech was over! It was so nice to see the classroom community we worked hard to build in the classroom come back to life through distance learning. The kiddos loved seeing each other on the screen and it was a fun way for us to celebrate their hard work!! Overall, it was a HUGE success and a nice change from the norm!
Click here or the image below to see this resource on TpT:

You can also choose to focus on INVENTORS and their special inventions! Click here or the image below to read more.

Thanks for reading! If you’d like to read about another one of my favorite ways to end the school year, check out my Book Club blog series! Send me a message on Instagram (@create_inspire_teach) if you have any questions and definitely share any photos with me if you decide to use this resource with your students!
Pin the image below to share this blog post on Pinterest!

💕 Courtney


